

Introduction
Below is the early history of my Sprite but this link is to a description of the car in its current ("finished") condition. The description is of the style that might fit a Bring-a-Trailer auction.
This car was a daily driver for its previous owner. He had completely disassembled it for a "frame up" restoration. With this just begun he decided, instead, to unload it as well as a couple of parts cars and several miscellaneous other parts. A friend of mine bought the whole package in hopes of making a little money by reselling. He had no interest in building a Sprite. I later bought this Sprite from him to restore. The car is complete although about as completely disassembled as it can get. The front wings and bonnet are not really attached but are just slightly held in place for the photo session.

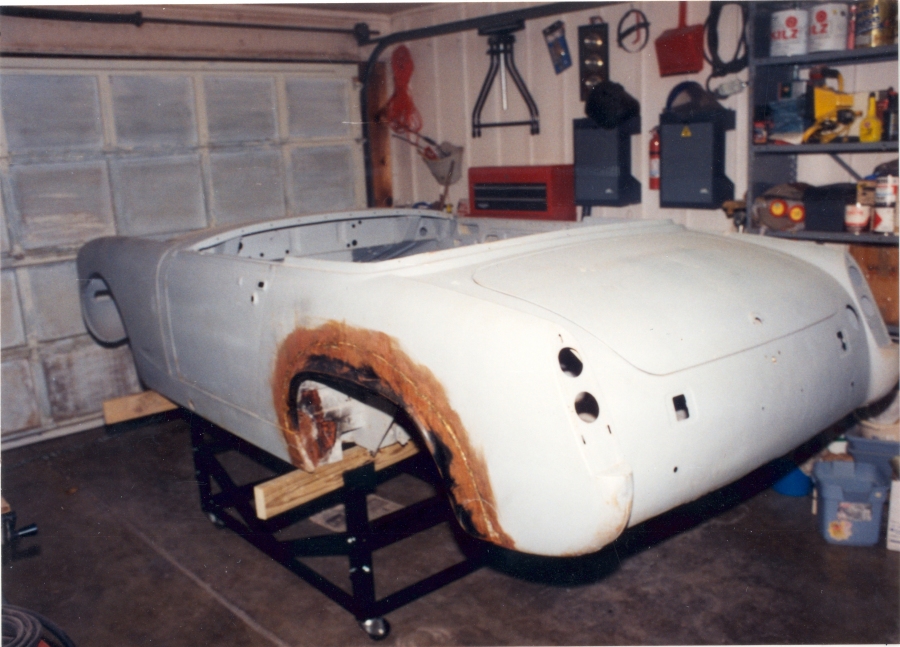 These two photos show the car in the condition I purchased it. Its original color was primrose (yellow) but it
is now in spray can primer. Note the left rear wheel arch, more on this later. Sorry for the closed garage but
it is February and really cold outside.
These two photos show the car in the condition I purchased it. Its original color was primrose (yellow) but it
is now in spray can primer. Note the left rear wheel arch, more on this later. Sorry for the closed garage but
it is February and really cold outside.
I built the adjustable steel dolly shown in these photos to set it on for restoration before taking delivery. Unfortunately it doesn't show up well in the scanned versions. Basically it is a 3 x 4 x 1 foot welded frame which unbolts to make flat storeable sides. The uprights which hold the car are adjustable, vertically, and the top supports are swivel brackets with 2x4s on which the car sits. The frame can be extended to 7 feet with bolt in extensions. I will try to scan a better copy of the dolly later.

 I started work almost immediately, repairing rust. The lower rear section of the left wheel well had already
been removed for replacement. It didn't look too bad at that point. But when I started repairing, it turned out
that I had to replace that whole section from the sill, through the frame, to the gearbox tunnel. Also about
the front six inches of the outer and inner sills were rotten and had to be replaced. These photos show what it
looked like before and after panel replacement but before painting. This section is obviously a design
flaw as there is a closed compartment between the footwell and the wheelwell.
I started work almost immediately, repairing rust. The lower rear section of the left wheel well had already
been removed for replacement. It didn't look too bad at that point. But when I started repairing, it turned out
that I had to replace that whole section from the sill, through the frame, to the gearbox tunnel. Also about
the front six inches of the outer and inner sills were rotten and had to be replaced. These photos show what it
looked like before and after panel replacement but before painting. This section is obviously a design
flaw as there is a closed compartment between the footwell and the wheelwell.

 The right side had been patched with a piece pop rivetted over the rust. When I removed that, I found it to
be worse than the left side. The front part of the outer sill had already been replaced, but it was poorly done.
I had to remove and reinstall that. But much of the inner sill as well as the footwell above the sill was also
gone. These photos show what was left first after removing the rivetted patch and the outer sill then after all
rusted stuff was removed. Note the cutaway inner sill and the large section missing above the sill.
The right side had been patched with a piece pop rivetted over the rust. When I removed that, I found it to
be worse than the left side. The front part of the outer sill had already been replaced, but it was poorly done.
I had to remove and reinstall that. But much of the inner sill as well as the footwell above the sill was also
gone. These photos show what was left first after removing the rivetted patch and the outer sill then after all
rusted stuff was removed. Note the cutaway inner sill and the large section missing above the sill.
 This one shows the same area after all repairs were made except for the final vertical lower wheelwell panel
and replacement of the outer sill. The round thing below the car is a clip on work light.
This one shows the same area after all repairs were made except for the final vertical lower wheelwell panel
and replacement of the outer sill. The round thing below the car is a clip on work light.
 This photo shows the most challenging repair to date. I found a little rust in the floor below the left side
jack port. In cutting this away, I discovered the crossmember which extends from the gearbox tunnel to the
inner sill, on the top side of the floor. This thing is structural; not only does it stiffen the floor and tie
the tunnel to the sill, but it also provides the necessary rigidity for the jack port. It is a closed,
rectangular tube, welded to the floor. As you might expect, my rust was inside this crossmember. It turns out
that the jack port is a piece of pipe, extending from inside, through and welded to the inner sill. The inner
end of that pipe is then welded to another bulkhead, inside the crossmember, about three inches inboard of the
inner sill. Most of this bulkhead, including the entire lower half, was completely rusted away. I had to
carefully cut the floor and peel it back to gain access. I then fabricated a new bulkhead and welded it in from
the bottom. I truly wish I had found John Nelson's web page before tackling this project. With the car inverted,
the repair would have been a relative piece of cake as compared to my method of doing it on my back. This photo
shows the repair, before uncurling and rewelding the floor section back in place.
This photo shows the most challenging repair to date. I found a little rust in the floor below the left side
jack port. In cutting this away, I discovered the crossmember which extends from the gearbox tunnel to the
inner sill, on the top side of the floor. This thing is structural; not only does it stiffen the floor and tie
the tunnel to the sill, but it also provides the necessary rigidity for the jack port. It is a closed,
rectangular tube, welded to the floor. As you might expect, my rust was inside this crossmember. It turns out
that the jack port is a piece of pipe, extending from inside, through and welded to the inner sill. The inner
end of that pipe is then welded to another bulkhead, inside the crossmember, about three inches inboard of the
inner sill. Most of this bulkhead, including the entire lower half, was completely rusted away. I had to
carefully cut the floor and peel it back to gain access. I then fabricated a new bulkhead and welded it in from
the bottom. I truly wish I had found John Nelson's web page before tackling this project. With the car inverted,
the repair would have been a relative piece of cake as compared to my method of doing it on my back. This photo
shows the repair, before uncurling and rewelding the floor section back in place.
These photos show the rear wing problem referenced above. The flare had apparently rusted and the previous
owner had begun repairs. He cut away the offending metal, purchased a new repair panel and brazed it in
 place. At first glance, it didn't look all that bad. The work proved to be entirely unsatisfactory, however.
I made a template of the other side just to be sure. The new one was almost a full inch out of place. He had
cut away the rusted flare of the wheel well and pressed the outer skin inward and brazed it to the remaining
wheel well. I had no choice but to remove and reinstall it properly. This is what it looks like with the patch
removed. You can just see where the outer skin was pushed inward and brazed to the inner panel. I'm afraid this
will be a difficult patch to install due to limited access to the inside. I will probably have to cut away most
of the inner wheel well to gain access to the back side to install the wing patch satisfactorily. Then I can
reinstall the cut out section of the well since it will not be so cosmetically noticeable.
place. At first glance, it didn't look all that bad. The work proved to be entirely unsatisfactory, however.
I made a template of the other side just to be sure. The new one was almost a full inch out of place. He had
cut away the rusted flare of the wheel well and pressed the outer skin inward and brazed it to the remaining
wheel well. I had no choice but to remove and reinstall it properly. This is what it looks like with the patch
removed. You can just see where the outer skin was pushed inward and brazed to the inner panel. I'm afraid this
will be a difficult patch to install due to limited access to the inside. I will probably have to cut away most
of the inner wheel well to gain access to the back side to install the wing patch satisfactorily. Then I can
reinstall the cut out section of the well since it will not be so cosmetically noticeable.

Since these photos were taken, I have finished all chassis repairs forward of the A pillar and have straightened, primed and painted the repaired parts. The new color will be Tartan Red (BMC RD9). It really helps you to feel like some progress is being made when you get some paint on. I will get some new photos and have them here soon.
Meanwhile, an employment change has temporarily stalled progress on the project. I do hope to get back to it in the very near future and will keep its progress pretty current on this page. Check back often for details.
A new direction has surfaced. Being retired and on a limited income as well as having other projects of interest, I have decided that this Sprite will probably be my last sports car. Therefore, I will finish it as I want it to be instead of making it saleable. Instead of repainting it Tartan (pronounced RESALE) Red, I now intend to go back to its original Primrose. I always liked that color on a car, especially a small one, and it is not a color that appears on nearly 50 percent of the sports and other toy cars of the world. It may not be easy covering the red already applied!
. . . Long Pause . . .
Suddenly, things have changed. My shop partner, Dan who is also my shop landlord, recently finished his last MGB and had not been able to find another project that interested him. He volunteered to start getting the Sprite ready just to have something to keep himself busy. Knowing that he had built 12 MGs over the years and, having seen some of his results, I felt it would be foolish to reject such a generous offer. So, let's start a new chapter for the final restoration of this little Austin Healey Sprite.
Note that these chapters represent the logical order of restoration and are in the order that each phase was started. A considerable amount of the actual work was performed out of order. For example, much of the body work discussed in chapter 4 was actually done after the engine was installed in chapter 5. I have chosen the actual chapters as much more logical than a straight chronological sequence which would surely have been more confusing to the reader as well as the writer.