

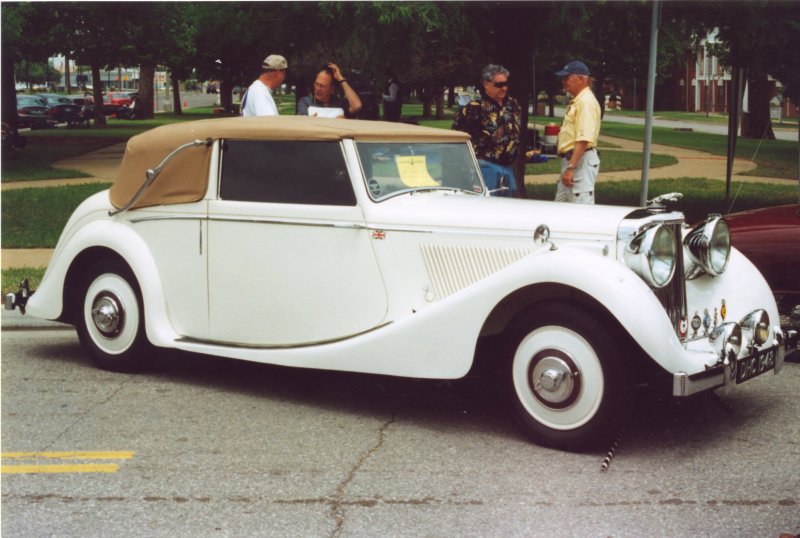
This is an older restoration that I am trying to complete for a friend. It is a 1950 Mercedes-Benz 170Va, the post-war version of the 170V, which was originally introduced in 1937. This is the car used by the German regular Army officers during WWII. The SS officers got the bigger, better-known cars.
Note: You can click on any of the small photos below to view a larger version
 The following is a brief history of the car and its restoration, as
told to me. Joe rescued it about 20 years ago from a back yard where it had been for many years. These photos
give a clue as to its condition at the time. Not too bad really. At least the sheet metal appeared to be in
pretty fair condition.
The following is a brief history of the car and its restoration, as
told to me. Joe rescued it about 20 years ago from a back yard where it had been for many years. These photos
give a clue as to its condition at the time. Not too bad really. At least the sheet metal appeared to be in
pretty fair condition.
 It was generally dirty and much of the paint was gone but it was all there and seemed to suffer from
very little rust. The upholstery was all rotted but the frames and springs were sound enough.
It was generally dirty and much of the paint was gone but it was all there and seemed to suffer from
very little rust. The upholstery was all rotted but the frames and springs were sound enough.
 All things considered, it looked to be a pretty good restoration project and Joe was a confirmed Mercedes
fanatic anyway. This photo is a look at the 4 cylinder flathead engine which, by the way, was frozen solid
as found. The view is from the right front. Above and behind is the fuel tank, mounted on the firewall. It
is a gravity feed system with an updraft carburetor.
All things considered, it looked to be a pretty good restoration project and Joe was a confirmed Mercedes
fanatic anyway. This photo is a look at the 4 cylinder flathead engine which, by the way, was frozen solid
as found. The view is from the right front. Above and behind is the fuel tank, mounted on the firewall. It
is a gravity feed system with an updraft carburetor.
Joe then spent the next several years, and I'm pretty sure several dollars too,
having it professionally restored to "nice driver" condition. It was never intended to be a show car.
After dismantling, thorough cleaning and removal of all the "soft stuff," they discovered that most of the
wood in the lower half of the body was rotten beyond salvaging and had to be replaced. This is a coach-built
body so that meant a bunch of wood, most of it in rather complicated shapes.

 These two photos give an idea of the extent of restoration. Look carefully and you can find a can, with
pump installed, of West System Epoxy used to repair and/or install much of the wood. That dished-out
section of the firewall is where the fuel tank resides.
These two photos give an idea of the extent of restoration. Look carefully and you can find a can, with
pump installed, of West System Epoxy used to repair and/or install much of the wood. That dished-out
section of the firewall is where the fuel tank resides.
Besides the obvious body restoration, the braking system was completely renewed. I don't think much was done to the engine other than free it up (it was frozen as found), replace electrical parts and adjust things such as carburetor and timing. Next, it received a nice, original-looking but modern interior and a burgundy lacquer paint job, along with a lot of replated chrome and a set of new tires. Finally, it went to an electrical expert for rewiring. After that, it went into storage for the next 10 years or so.
At the end of the storage era was when I got involved. Joe decided it was time to get it running and driveable. He would decide later whether to sell the car or keep it. I determined that the first step was to make it run and proceded toward that end. The first unwelcome discovery was that the engine was frozen again. I spent two weeks with various magical penetrating oils trying to free it up all to no avail. It was still possible, when trying to rock it in gear, to slide the rear wheels clear across the garage floor.
Ultimately, I had to remove the head (fortunately Joe had a couple of spare head and manifold gaskets). The cause was immediately apparent. The head probably had not been properly torqued because the gasket had partially failed and let water and antifreeze into the front pair of cylinders. Two valves were badly rusted (this is a four cylinder sidevalve engine) and significant damage appeared on both cylinders. Another week of penetrating oil (a mutual friend, Harold who is really good at fixing old problems, loaned some of a brand named Kroil) along with daily tapping on the piston tops finally saw them move almost imperceptibly. This was the encouragement we were waiting for. With a little more work, the engine turned easily enough to begin work on it. I honed all four cylinders as much as I thought safe which removed about 90% of the rust damage. That still left two of them with enough pitting to cause a certain amount of oil consumption and resulting smoke. Number two also had a noticeable vertical scratch running its entire length. I suggested that the engine should be removed from the car and sent to a machine shop for overhaul. That surely would have been an expensive operation and Joe elected to try it as it was first. A bit of smoke was an acceptable option when compared to the cost of an overhaul.
After polishing the cylinders, it turned over well enough. The next step was to salvage the valves. Replacements were available from Germany but at considerable cost and delay. I removed them to be resurfaced at a local machine shop for a fraction of the cost of a single replacement. The rust damage was pretty severe and all eight are now very thin but should last for some time, no more than the car is expected to be run. The seats were a different matter altogether. Remember this is a sidevalve, or flathead, engine. The seats are in the top of the engine block. Well, our old friend Harold came to our rescue again. He managed to borrow an antique valve seat grinding kit that was acquired when our local Studebaker dealer closed up. With this kit and some creative linkage combinations, I was able to resurface the seats to also be serviceable. As the valves, they are thinner than desirable but still should last some time. With that done, I reassembled it all and adjusted the valves to see if it would start.
The next problem made itself known right away. The starter pulled over 375 amps. Joe had acquired a copy of a service manual which stated it should be 250. Even with a 12 volt jump (we didn't have a proper 6 volt battery yet) it was hard pressed to turn the engine that turned rather easily by hand. Of course, that hand turning was with the head off. In looking through the notes from previous work, we discovered one stating that the starter was defective and required an overhaul. I removed it for cleaning an lubrication and could see nothing else wrong electrically although I don't have the necessary test equipment for proper diagnosis. After reinstallation, it turned the engine acceptably, still with the 12 volt jump.
Those same notes also stated that the carburetor was not repairable and would have to be replaced. This was also available from Germany but, at significant cost. Although I had never worked on an updraft carburetor, it looked like a simple enough device so I went through it, vatted it out, made a couple of gaskets and reassembled it after checking all the passages and jets, feeling confident that it would work fine. A little work on the distributor and a new set of spark plugs was then all that it needed to spring to life, still using the 12 volt jump. That done, I changed the oil, ordered a fan belt and charged the cooling system.
The engine would run for a few minutes at a time then die, apparently starved for fuel. I'll skip all the boring details here but the tank had to be removed three times before I got it to work properly. This is a gravity feed system with the tank mounted transversely at the top of the firewall. It had considerable rust and other junk inside that had to be cleaned out and a fitting in the bottom that feeds fuel to the carburetor had been improperly soldered so that it leaked very slowly onto the passenger's feet. After repairing all that, I indirectly discovered, or surmised, that a previous restorer had disassembled the carburetor and reassembled it incorrectly. I would add a gallon or so of gas to the tank and run the engine for several minutes. By the time I came back the next day, the tank would again be empty. After several times, I finally determined that it could not be consuming fuel at that rate. I carefully examined the fuel lines again for leaks and found none. Finally, I rolled under the car; the front had been on jack stands for some time. I found a slow fuel drip from the back of the belly pan. This proved to be coming from the carburetor. Remember it is a very simple updraft unit. The main jet is at the bottom of the float bowl and with the front of the car raised, fuel just dripped out into the body where the was a relief hole allowing it to escape to the garage floor where it evaporated overnight. Someone left out the gasket in the assembly that holds the main jet. With a new gasket made and installed, the mysteriously excessive fuel consumption was remedied.
With the car runnable, it was time to make it stoppable. The ravages of ten years of neglect left the brakes obviously in need of considerable attention. All cylinders, including the master, proved to be beyond honing. We removed and sent the whole works to Whitepost for brass sleeves. The flexible hoses had also been attacked by the fluid and had to be replaced. About half of the fittings had rusted to the point that they twisted the steel lines in removing the hoses. Those lines all had to be replaced. The worst part of the whole ordeal was removal of the master cylinder. It is located so as to be all but impossible to reach anyway and the previous restorer had mounted it using S.A.E. bolts and nuts which can be felt but not seen. By the time I figured that out, I had tried every tool at my disposal and banged up every one of my knuckles. That was a shame, considering the ready availability of proper metric fittings.
With the car running and stopping well, attention turned to details. I next installed various trim pieces that Joe had stored and finally found a locksmith who would make a key to fit the ignition lock. Joe searched everywhere but was unable to locate the original. He had been told years ago that it would not be possible to find a battery to fit. It is 6 volt and mounts under the driver's seat. It turned out to not be all that hard as I found an industrial battery, 19L I think, that fit perfectly. Further research indicates that a Volkswagen 6 volt battery would also easily fit.
This all done, we were invited and took the car to the local Jaguar Club's annual car show. I'll describe that below. There were still several things needing attention. There were a couple of places where the paint, and even the bodywork, had minor damage and there were still some trim pieces to fabricate or add. The biggest item left was the starter. It still drags considerably under 6 volts to the point that it has a hard time starting the engine when cold. We planned to accomplish these things at some leisure over the next several months.
The next section of this page explains some of the details and shows pictures from the Jaguar Club's annual car show May 22, 2004. We were invited to bring the car to the show, not as a registered entry of course, but just as a special interest guest. The club receives great support from the Jaguar dealer, who also happens to be the Mercedes-Benz dealer. The dealerships are side-by side and the show was in a park just across the street.
I can proudly announce that the dealer also took an interest in the little 170 and invited us to park it on the lawn right in front of their showroom, the same showroom that housed a CS 55 AMG and a new Mayback, along with several lesser cars, with an SL500 and SL600 parked in front. You'll see this in some of the accompanying photos.
This group of photos was taken the night before the show
Again, you can click on a small photo to view it full size
The car was parked between a new SL500 and an SL600 on the drive in front of the showroom. Note the radiator star is missing for security purposes. Those things have an uncanny way of disappearing if not protected. We were invited to store the car in the security of the service department overnight where they charged the battery, tightened spark plugs and accomplished a few other nice details.


Front View beside the SL500
Again with the SL500


CS55 AMG in the background
Left Rear with SL500
This group is from the day of the show
The star is now proudly displayed
For the Jaguar show, the dealer parked our little Benz on the front lawn, under the big Mercedes-Benz sign, right in front of his new car showroom. Although it was across the street from the show, it drew almost as much interest as most of the show cars. Joe was pretty proud of that.


See the Maybach in the showroom
Left Side on the lawn


Right Side with dealership sign
Driver side - door open


From Jag show - Dealership behind
Jaguar show in background
This group is from the actual Jaguar show
It is included just to prove that there really was a Jaguar car show going on across the street at the same time. Well, it doesn't really prove anything. You'll just have to trust me on that one, I guess.

My choice at the show
A Jaguar MkIV Drophead Coupe
It saddens me beyond expression that Joe suddenly died October 20, 2004 of an unexpected heart attack. I don't know whether the car will ever be finished but that is unimportant. I lost a good friend of many years. I am thankful that I knew him as long as I did and that I had the opportunity and his confidence to work on this project with him.
And now for the rest of the story
Joe's family had no interest in the car. They asked Harold to try to sell it for them. It turns out that Harold is also president of the Jaguar club this year and has a really good relationship with the Jaguar/Mercedes-Benz dealer. He suggested that they might be interested. So, he talked to them about it and reminded them where it sat during the Jaguar show. They remembered and were interested, wanted to see it again, even offered to send a truck to retrieve it. Both the owner and general manager had been out of town on the day of the show but there had been talk about the car among several of the employees.
Harold and I decided it would be much better if we delivered the car instead. Toward that end, we collected ourselves and a few tools at the storage site on a Saturday morning. I had charged the battery ahead of time. The weather was nice and we decided to drive it to the dealership, a trip of some 12 miles, part of it in some traffic. You are probably thinking that decision was a mistake since the car had not been driven at all except around the parking lot at the storage facility and the car show. Well, read on. Remember, it still had at least 2 known problems. The starter draws too many amps and the fuel tank still had rust inside. We had to jump it with 12 volts to get it started but it seemed good after that.
After letting it run for a while and checking everything out, we headed toward town. I drove the Benz and Harold followed behind. About 2 miles down the road, the rust from the tank clogged an elbow in the gravity fed fuel line. I had devised a rather simple fix. I disconnected the fuel filter, slipped a hose onto the fitting and blew into it a few seconds to dislodge the clog. With that done, we resumed our journey. All went well for about the next 6 miles when, waiting for a red light, a sudden cloud of steam erupted from under the hood. The cooling system had dumped its water and drowned the distributor, killing the engine immediately and this all happened while headed uphill at probably the busiest intersection on our entire journey. I guess it was smart for Harold to follow.
Risking life and limb, Harold blocked traffic enough that I was able to roll it back down the hill, half a block, onto a side street. We then retrieved the tow dolly and took it back to storage to investigate the problem. The rest of that is uninteresting except to say that we really found no problem. Perhaps the thermostat is faulty although it appears all right.
The next Friday, we decided to try delivery again. This time, not willing to take such a bold step, we would tow it but stop about a block away and drive that last bit. Before going, Harold constructed and we installed a sort of little stand pipe in the tank outlet so that fuel was taken about an inch above instead of right off the bottom. This modification should help if not completely eliminate the rust clogging problem.
The trip was uneventful. We arrived at the dealership and parked on the drive in front of the showroom again. Friday afternoon is (our contact) the general manager's day off so we parked it in the shop for the night. Monday morning they tried to start it only to find it was out of gas. In adding some, a portion was spilled onto the tank and ran under to lie on the shelf where the tank mounts. This then drips, or runs depending on the quantity, right inside the car onto the transmission tunnel. That stopped any further progress until the spill could be cleaned or had time to evaporate.
The problem proved to be worse than expected. The tank had developed at least one pinhole and a fairly large soft spot from the internal rust. It had to come out for repair. It was decided that the rust was too much for a solder repair so we patched the bottom with PC-7, an epoxy made especially for that purpose. It should last for a long time but the tank really needs to be replaced or at least lined. That rust will just contine to grow and the bottom metal is too thin for thorough cleaning and repair.
With that done, the car was thoroughly detailed and driven into the showroom two weeks before Christmas where it is parked in pretty impressive company. On its right is a new SL600 Biturbo and at its rear is a perfectly restored 300SL Gullwing that was once owned by Clark Gable. Joe would be proud indeed.
I went back less than a week before Christmas to take a few photos. The showroom had
been rearranged a little; this is a working dealership and I guess cars do sell, even the expensive ones. The
Maybach, however, is still available.

 Meanwhile, our MB dealer has made an offer to purchase the car since it looks so good in the showroom. When
not there, it will most likely be found in their museum, unless one of the owners is out test driving it.
Meanwhile, our MB dealer has made an offer to purchase the car since it looks so good in the showroom. When
not there, it will most likely be found in their museum, unless one of the owners is out test driving it.
Here it is, in the showroom, right next to the Christmas tree.
And we have views from a few more angles.


If you wondered, the beautiful silver sculpture that looks like it is just about to fly away is, of course,
Clark Gable's 300SL Gullwing coupe.
It's now February and there is one more short chapter to report. The new owners wanted to actually use the car instead of just letting it sit around. That starting problem made it impractical since it was really hard to start most of the time. Often, a 12 volt jump was necessary.
I removed the starter and finally found a local shop willing to work on it. Bench testing showed that it did draw a little more current than specified in the manual but, according to the expert, not nearly enough to cause the problems we were having. He suggested heavier cables and attention to all the connections and contact points before rewinding the starter. If you ever have similar starter problems, particularly in a 6 volt system, I urge you to do the the following first.
I started by building new cables from 2/0 gauge wire, using soldered ends. Then, a previous restorer had painted the starter case as well as the bell housing where it mounts. It was metalic silver paint but I carefully removed all of it as well as any paint and rust where the ground straps connect to the body and chassis. There were 2 of them. Finally, the starter is foot actuated. I removed the actuator and worked on the heavy copper contacts to increase the contact area. With this all done, it spins right over and starts within the first few revs. Problem solved and $250 saved.